by gngshn [email protected]
上一篇文章我们讲到了 libuv的初始化, 现在乘热打铁, 我们接着看看 libuv的 event loop是如何运转的.libuv design overview
1
2
3
4
5
6
7
8
9
10
11
int main () { uv_loop_t *loop = malloc (sizeof (uv_loop_t )); uv_loop_init(loop); printf ("Now quitting.\n" ); uv_run(loop, UV_RUN_DEFAULT); uv_loop_close(loop); free (loop); return 0 ; }
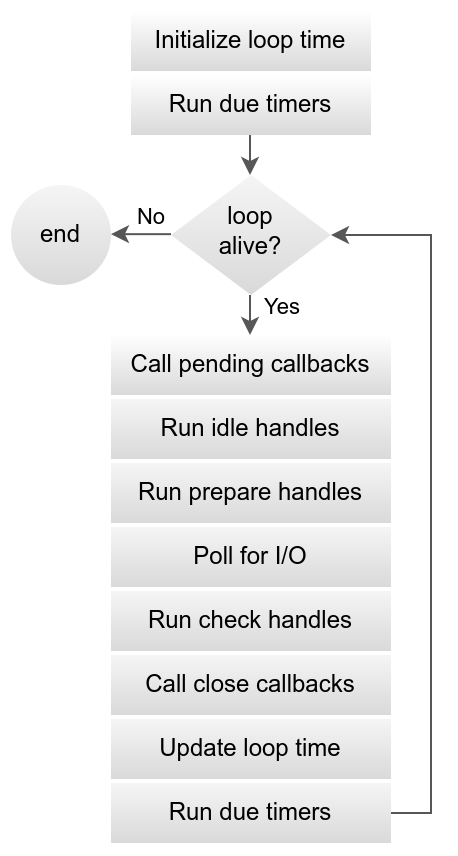
可以看到 libuv的 event loop过程在 uv_run中实现的. 我们下面来看看其过程.
1
2
3
4
5
6
7
8
9
10
11
12
13
14
15
16
17
18
19
20
21
22
23
24
25
26
27
28
29
30
31
32
33
34
35
36
37
38
39
40
41
42
43
44
45
46
47
48
49
50
int uv_run (uv_loop_t * loop, uv_run_mode mode) { int timeout; int r; int ran_pending; r = uv__loop_alive(loop); if (!r) uv__update_time(loop); while (r != 0 && loop->stop_flag == 0 ) { uv__update_time(loop); uv__run_timers(loop); ran_pending = uv__run_pending(loop); uv__run_idle(loop); uv__run_prepare(loop); timeout = 0 ; if ((mode == UV_RUN_ONCE && !ran_pending) || mode == UV_RUN_DEFAULT) timeout = uv_backend_timeout(loop); uv__io_poll(loop, timeout); uv__run_check(loop); uv__run_closing_handles(loop); if (mode == UV_RUN_ONCE) { uv__update_time(loop); uv__run_timers(loop); } r = uv__loop_alive(loop); if (mode == UV_RUN_ONCE || mode == UV_RUN_NOWAIT) break ; } if (loop->stop_flag != 0 ) loop->stop_flag = 0 ; return r; }
函数首先判断 event loop是否是 alive的, 如果不是, 更新 loop时间然后就退出了. 这里判断 alive的函数为:
1
2
3
4
5
static int uv__loop_alive (const uv_loop_t * loop) { return uv__has_active_handles(loop) || uv__has_active_reqs(loop) || loop->closing_handles != NULL ; }
可以看到, libuv判定 event loop存活(继续循环)的逻辑为有活动的 handle, request或者待关闭的 handle.uv__loop_alive返回 false时, 就不进行循环, 直接退出. 如果返回 true, 就进行循环.
uv__update_time(loop)细心的你们在阅读代码时, 可能会发现, libuv为了性能(效率)尽可能的再优化每一个细节, 比如 time更新这个地方
1
2
3
4
5
6
7
8
9
10
11
12
13
14
15
16
17
18
19
20
21
22
23
24
25
26
27
28
29
30
31
uint64_t uv__hrtime (uv_clocktype_t type) { static clock_t fast_clock_id = -1 ; struct timespec t ; clock_t clock_id; if (type == UV_CLOCK_FAST && fast_clock_id == -1 ) { if (clock_getres(CLOCK_MONOTONIC_COARSE, &t) == 0 && t.tv_nsec <= 1 * 1000 * 1000 ) { fast_clock_id = CLOCK_MONOTONIC_COARSE; } else { fast_clock_id = CLOCK_MONOTONIC; } } clock_id = CLOCK_MONOTONIC; if (type == UV_CLOCK_FAST) clock_id = fast_clock_id; if (clock_gettime(clock_id, &t)) return 0 ; return t.tv_sec * (uint64_t ) 1e9 + t.tv_nsec; }
CLOCK_MONOTONIC_COARSE这种类型的 clock精度足够就会用这种类型, 因为这种类型的 clock使用 vDSO, 可以降低系统调用的开销.
uv__run_timers(loop)1 2 3 4 5 6 7 8 9 10 11 12 13 14 15 16 17 18 void uv__run_timers (uv_loop_t * loop) { struct heap_node * heap_node ; uv_timer_t * handle; for (;;) { heap_node = heap_min((struct heap*) &loop->timer_heap); if (heap_node == NULL ) break ; handle = container_of(heap_node, uv_timer_t , heap_node); if (handle->timeout > loop->time) break ; uv_timer_stop(handle); uv_timer_again(handle); handle->timer_cb(handle); } }
所有的timer handles都是用 uv_timer_start调用来注册生效的. uv__run_timers就是把注册的 timers中到期的 timer去掉并注册回调, 具体过程为:timer_heap(最小堆)取 timer, 这是最小的 timer, 如果 timer比现在的时间大, 表明没超时, 就可以退出了, 如果比现在的时间小, 表明已经超时, 就将 timer从 heap中删除, 然后调用 uv__handle_stop停止 handle. 再调用 uv_timer_again(会调用uv_timer_start)再次开启有 repeat值的 timer, 这次 timer的时间是按照 timer的 repeat时间来设定, 也就是 timer可以周期性触发. 最后调用 timer的 timer_cb回调.
这里刚好遇到了 handle的操作, 之前没细说, 这里细说下:
1 2 3 4 5 6 7 8 9 10 11 12 13 14 15 16 17 18 19 20 21 22 23 24 25 26 27 28 29 30 31 32 33 34 35 #define uv__handle_start(h) \ do { \ assert(((h)->flags & UV__HANDLE_CLOSING) == 0); \ if (((h)->flags & UV__HANDLE_ACTIVE) != 0) break; \ (h)->flags |= UV__HANDLE_ACTIVE; \ if (((h)->flags & UV__HANDLE_REF) != 0) uv__active_handle_add(h); \ } \ while (0) #define uv__handle_stop(h) \ do { \ assert(((h)->flags & UV__HANDLE_CLOSING) == 0); \ if (((h)->flags & UV__HANDLE_ACTIVE) == 0) break; \ (h)->flags &= ~UV__HANDLE_ACTIVE; \ if (((h)->flags & UV__HANDLE_REF) != 0) uv__active_handle_rm(h); \ } \ while (0) #define uv__handle_ref(h) \ do { \ if (((h)->flags & UV__HANDLE_REF) != 0) break; \ (h)->flags |= UV__HANDLE_REF; \ if (((h)->flags & UV__HANDLE_CLOSING) != 0) break; \ if (((h)->flags & UV__HANDLE_ACTIVE) != 0) uv__active_handle_add(h); \ } \ while (0) #define uv__handle_unref(h) \ do { \ if (((h)->flags & UV__HANDLE_REF) == 0) break; \ (h)->flags &= ~UV__HANDLE_REF; \ if (((h)->flags & UV__HANDLE_CLOSING) != 0) break; \ if (((h)->flags & UV__HANDLE_ACTIVE) != 0) uv__active_handle_rm(h); \ } \ while (0)
上面这四个宏用来开启, 关闭, 引用, 解除引用handle, 这里要注意到几点:
在开启 handle时, 当 UV__HANDLE_ACTIVE已经置起来时(handle已经开启了), 就不进行后面的操作了, 所以可以重复调用 uv__handle_start不会产生问题. 关闭 handle时同理.
在引用 handle时, 当 UV__HANDLE_REF已经置起来时(handle已经引用过了), 就不再增加引用计数了, 所以重复调用, handle也只会增加一次引用计数, 解除引用 handle时同理.
uv__active_handle_add和uv__active_handle_rm增加/减少的引用计数是loop的(而不是handle本身)引用计数, 字段为active_handles, 因此一个handle可以通过ref或unref来让一个handle是否影响到loop的active, 比如libuv的async_handle就通过uv__handle_unref来防止event loop无法退出.
uv__run_pending 1 2 3 4 5 6 7 8 9 10 11 12 13 14 15 16 17 18 19 20 static int uv__run_pending (uv_loop_t * loop) { QUEUE* q; QUEUE pq; uv__io_t * w; if (QUEUE_EMPTY(&loop->pending_queue)) return 0 ; QUEUE_MOVE(&loop->pending_queue, &pq); while (!QUEUE_EMPTY(&pq)) { q = QUEUE_HEAD(&pq); QUEUE_REMOVE(q); QUEUE_INIT(q); w = QUEUE_DATA(q, uv__io_t , pending_queue); w->cb(loop, w, POLLOUT); } return 1 ; }
很简单, 就是把pending_queue所有io事件取出来, 并调用相关回调. pending queue的加入等以后再说.
uv__run_idle, uv__run_prepare以及后面的uv__run_check 这三个调用分别操作idle_handles, prepare_handles以及check_handles. 这三种handle都是用下面的宏来操作:
1 2 3 4 5 6 7 8 9 10 11 12 13 14 15 16 17 18 19 20 21 22 23 24 25 26 27 28 29 30 31 32 33 int uv_##name##_start(uv_##name##_t* handle, uv_##name##_cb cb) { \ if (uv__is_active(handle)) return 0; \ if (cb == NULL) return -EINVAL; \ QUEUE_INSERT_HEAD(&handle->loop->name##_handles, &handle->queue); \ handle->name##_cb = cb; \ uv__handle_start(handle); \ return 0; \ } \ \ int uv_##name##_stop(uv_##name##_t* handle) { \ if (!uv__is_active(handle)) return 0; \ QUEUE_REMOVE(&handle->queue); \ uv__handle_stop(handle); \ return 0; \ } \ \ void uv__run_##name(uv_loop_t* loop) { \ uv_##name##_t* h; \ QUEUE queue; \ QUEUE* q; \ QUEUE_MOVE(&loop->name##_handles, &queue); \ while (!QUEUE_EMPTY(&queue)) { \ q = QUEUE_HEAD(&queue); \ h = QUEUE_DATA(q, uv_##name##_t, queue); \ QUEUE_REMOVE(q); \ QUEUE_INSERT_TAIL(&loop->name##_handles, q); \ h->name##_cb(h); \ } \ } \ \ void uv__##name##_close(uv_##name##_t* handle) { \ uv_##name##_stop(handle); \ }
可以看出这三种操作很简单.start就是把 handle加入到相应的queue, 然后调用uv__handle_start, stop就是将handle移动出来然后调用uv__handle_stop, run就是就是依次执行queue上面所有handle的回调.
uv_backend_timeout 这个函数比较简单, 就是计算下一次poll的超时时间. 当然, 这个函数只在pending队列被执行前是空的(这样就保证
1
2
3
4
5
6
7
8
9
10
11
12
13
14
15
16
17
18
int uv_backend_timeout (const uv_loop_t * loop) { if (loop->stop_flag != 0 ) return 0 ; if (!uv__has_active_handles(loop) && !uv__has_active_reqs(loop)) return 0 ; if (!QUEUE_EMPTY(&loop->idle_handles)) return 0 ; if (!QUEUE_EMPTY(&loop->pending_queue)) return 0 ; if (loop->closing_handles) return 0 ; return uv__next_timeout(loop); }
可以看到, 当 event loop确认自己还有事情要做的时候, 就会返回0, 表示下次poll是非阻塞的.uv__next_timeout比较简单, 就是从 timer_heap中得到最小超时的时间, 从而计算出下一次的超时时间, 如果 timer_heap是空, 表示下一次poll可以无限制的等待.
uv__io_poll uv__io_poll是整个 event loop中的最关键, 这部份内容较多, 我们下一篇来讲.
uv__run_closing_handles 这个函数用来关闭所有的待关闭的 handles, 通过调用 uv__finish_close来实现. 这个函数会关闭 handle并调用对应的回调函数, 这部份比较杂, 如果后面有机会再讲讲.
1
2
3
4
5
6
7
8
9
10
11
12
13
static void uv__run_closing_handles (uv_loop_t * loop) { uv_handle_t * p; uv_handle_t * q; p = loop->closing_handles; loop->closing_handles = NULL ; while (p) { q = p->next_closing; uv__finish_close(p); p = q; } }
整个 event loop后续部分就比较简单了, 就不再说了. 至此我们就看完了. 如果你把代码和官方的文档中的流程图对应一下, 就会发现是一致的.